ΝΕΑ

S5 Flex Menu - Menu System

The S5 Flex Menu system is a very powerful plugin that provides functionality far beyond what the standard Joomla menu system can provide. This plugin is intended to be as an extension of the existing menu system in Joomla to add many new features! Please see the full list of features below.

This menu system works off of the core Joomla mootools script so no extra javascript library is needed and keep download sizes to a minimum. Also, if you do not want to use this menu you can simply turn it it off from the template configuration page.

Take your website to the next design level by using the robust and feature rich S5 Flex Menu System. Organize your links with ease and show content in places you never could before!

Please note - this template does not support sub text on the first level links. However, all sub menus do.

Menu Features:

  • Multiple javascript effects with core mootools
  • Multiple columns for menu items or modules
  • Modules load directly into the menu
  • Group sub menu items into the same column or fly out
  • Optional sub texts for each menu item
  • Optional menu icon images for each menu item
  • And much more!


Menu Screenshot:


I like what I see! I want to JOIN TODAY.

Installing The Template


    • Download the installation package from our download section.
    • Once the download is complete go to the backend of Joomla.
    • Navigate through your menu system to Extensions/Extensions Manager.


    • Once at the installation screen click the browse button and navigate to where you downloaded the template file.
    • Once you have the file selected click 'Upload File and Install'
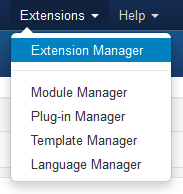
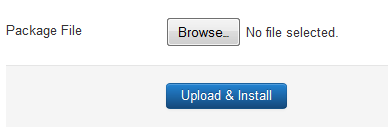
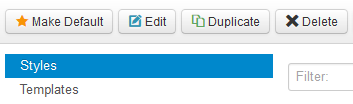
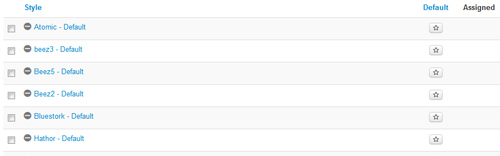
    • The template is now installed, now let's set it as the default template:

    • Navigate through your menu system to Extensions/Template Manager.
    • Find the radio button next to the newly installed template.
    • Click on the Default button at the top right of the screen and you're done!


The Template's Settings

This template comes loaded with options that you can use to customize your site exactly how you want it. Here's how to get to these custom settings:

  1. In the backend of Joomla go menu item Extensions/Template Manager.
  2. Click on the title of the template.
  3. This will bring you to the template manager screen where you can edit the template's parameters.
  4. Click save when you are done


I like what I see! I want to JOIN TODAY.


Tool Tips


Note - The tool tips script is by default disabled. If you wish to use it you must enable this script in the template's configuration area. This also includes site shaper installations.


Demo 1:


Demo 2:
Demo 2 Image Tool Tip

Demo 3:
Demo 3 Image Tool Tip

Site Shapers


So what are Site Shapers? They are quick installs of Joomla combined with all the modules, content, etc used on our demo, excluding stock photography. Within a few minutes you can have your site up, running and looking just like our demo. No more importing SQL dumps and installing modules. Just head on over to the download section of this template and grab a Site Shaper. Simply install the Site Shaper like any other Joomla installation, it's that easy!


How to setup a Site Shaper


  • Login to your cpanel or your server admin panel.
  • Locate the area where your databases are (usually labeled Mysql Databases)
  • Create a new database
  • Next create a new database user and assign it to this newly created database in the previous step
  • You will then need to extract the site shaper to either a folder on your server or the root directory such as WWW. NOTE: if you already have a website in the root of your WWW folder, we suggest creating a new folder and extract the site shaper there. If your cpanel does not have an extract option or you cannot find it, you may also extract the contents of your site shaper in to a folder on your desktop and upload all the files via an ftp client to your server.
  • Next, navigate to the url where you extracted the site shaper via your web browser.
  • Continue through each screen until you reach the below screenshot:


  • At the above screen be sure to enter localhost as shown, continue to fill in the following text fields with your newly created database and username information
  • Follow through the rest of the site shaper setup and click the install sample data at the last screen and the installation is complete! (be sure to rename/remove the installation directory after finishing the install)


S5 Accordion Menu


The S5 Accordion menu is demo'd on the right of this page. This version was built specifically for this template and cannot be transferred to another template. We do have another version that can be used on any Joomla template.

This module is based off the Joomla main menu system module so you can still specify which Joomla menu you want to use with the S5 Accordion menu. The menu is powered off of the Mootools Javascript library but detects to see if the library is already initialized, if so then it doesn't load its own library to stop any conflicts from arising.

I like what I see! I want to JOIN TODAY.

Login and Register Setup

The S5 Box can be demo'd by clicking on either the Login or Register buttons found towards the top of this page.

The module allows for up to 10 different S5 Box's on one page all via 10 module positions. You simply add a class to any HTML element on your site and enable the corresponding box and you are good to go!

To enable the login and register modules:

1. Install the S5 Box module and publish it to all pages on your site. Try to publish it to a position where a module already exists on all pages, but don't worry it won't change the layout of your site, the script is automatically hidden on your site.

2. Install and publish the S5 Register module to the 'register' module position

3. Publish the default Joomla login module to the 'login' module position.

4. In your template parameters area of Joomla you can change the text for login, register and logout.

5. That's it, you're all done!


If you do not wish to use the S5 Box but would still like to use the Login and Register links then simply complete step 4 above and also fill out your own custom urls just below those fields in the template configuration. Filling out the custom url fields will disable the S5 Box.

The S5 Box runs off of the jQuery Javascript library in a no conflictions mode so you should not receive any problems with other third party extensions you may be running on your site. Alternatively you can also the core Joomla mootools script.

Features:

  • Powered by no conflict mode jQuery Javascript or mootools
  • Choose, elastic, fade or none for the popup effect
  • Up to 10 S5 Box's throughout your site or on any one page!
  • Set the percentage of width of each box according to overall screen size


Tutorial on how to get the s5 box working and use all 10 module positions it includes


1. Adding the S5 Box positions:

  • Open up the templateDetails.xml file included with the template you are using.
  • Locate the positions area.
  • Start adding new positions s5_box1, s5_box2, s5_box3, etc all the way up to s5_box10.

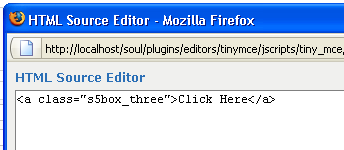
2. Adding the S5 Box classes:

  • The S5 Box class name of the corresponding position must be added to the link that will open the box. For example the following code will display a link that says Click Here and will open the S5 Box and display whatever module is published to the s5_box3 module position:


  • These classes can be added to any element, ie: divs, spans, etc., but the common use will be to add this into content with a link similar to the one shown in the picture above. To enter this link you must do so from the HTML edit screen on your content editor:

    Once you have clicked the HTML button the HTML code window will appear much like the first image.
  • You can continue adding these classes throughout your site just be sure to have published a module to the corresponding position or the box will not work correctly. So if you add the class s5box_two you will also have to publish a module to the s5_box2 position.
  • Module positions and their corresponding classes:

    s5_box1 = s5box_one
    s5_box2 = s5box_two
    s5_box3 = s5box_three
    s5_box4 = s5box_four
    s5_box5 = s5box_five
    s5_box6 = s5box_six
    s5_box7 = s5box_seven
    s5_box8 = s5box_eight
    s5_box9 = s5box_nine
    s5_box10 = s5box_ten

3. Lastly, publish your modules to the S5 Box positions:

  • Now that you have added the s5 box positions just go to your site modules area and publish modules to those positions
  • Make sure that you have added a class to an HTML element as described above or the s5 box will have no activation button
  • Also make sure to publish the actual s5 box to a non s5 box position, perhaps publish it to the "debug" position or a similar one in your template.


Main S5 Box Module Settings:

  • In the backend of the S5 Box module you can adjust the width of each box independent of each other.
  • Make sure that the S5 Box module is published to all pages, it can be published to any template position. Also make sure that the module opening in the box is published to the page the link is on.

Solar Frontier SF150-S

Solar frontier sf150-s


 solar frontier greece

Επίσημος Αντιπρόσωπος
της Solar Frontier
στην Ελλάδα

ΜΙΚΡΕΣ Α/Γ ΕΩΣ 50KW

ΕΠΕΝΔΥΣΤΕ ΣΤΙΣ ΜΙΚΡΕΣ Α/Γ 40KW M& 50KW | ΚΑΝΤΕ ΑΙΤΗΣΗ ΤΩΡΑ | 2122224700 | 2810390200

XZERES

Atmospheric CO2


Guests Online Info

We have 2 guests and no members online

There is no energy crisis....

.